Using the WMS Interface
Footprint makes use of a familiar feeling user interface, based around Microsoft's .NET Framework. Though navigating the software will seem second nature to many experienced users, those new to this type of workspace may need a little help using it to its fullest potential. Experts may find value in brushing up on these concepts as well.
Main User Interface
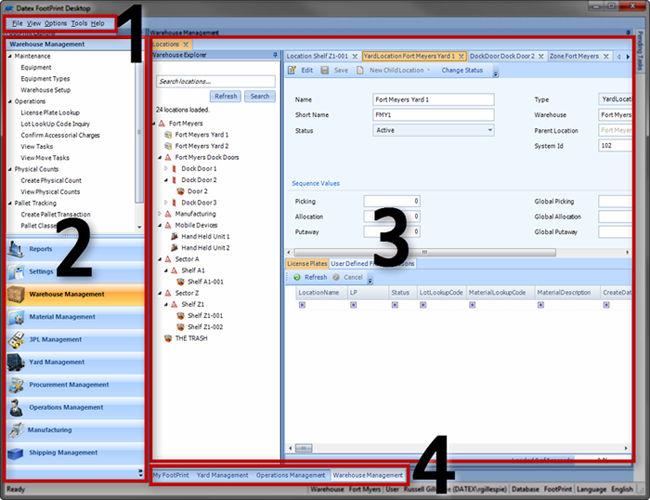
The main interface is divided up into four main sections:

This is your traditional Windows Menu, with all of the standard sections: File, View, Options, Tools, and Help. Within each item lay a few options:
| File | You can create new Inbound and Outbound Orders here, and Exit the program. |
| View | Quick access to some of the more common windows you will be using in Footprint. |
| Options | Change your default Language for Reports (see: Reports) and default Warehouse, and select which Warehouses you want to view. |
| Tools | Reset the layout, adjust system settings, and flush the cache. |
| Help | Information about Footprint, and access to the Help guides. |
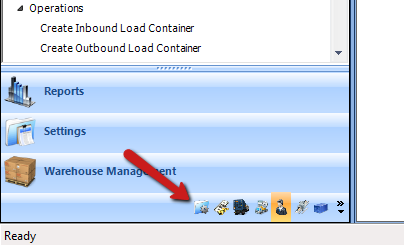
The Footprint Explorer provides you access to all the different modules you will be using in Footprint. This is where you'll be going to create Orders, to set up Warehouses, to add Materials, and pretty much everything else. It is presented in an "accordion style" setup, such that clicking the name of one of the modules on the bottom part of the menu will bring up its contents in the top portion of the menu, where you will double-click the section you'd like to open.
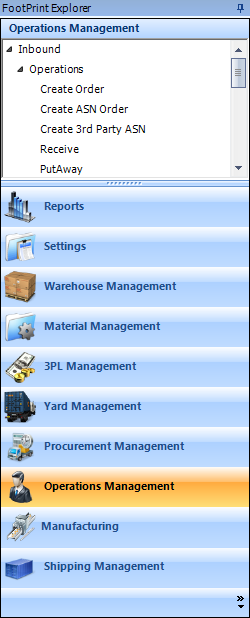
The Footprint Explorer contains the following modules:
| Reports | Transform the data you've collected inside Footprint into an easy to read Report, configured to your specifications. |
| Settings | Set up all the specifics of your operation. This is where you will enter information about your Enterprise, the Owners you work with, the Projects associated with them, your Workflows and Alerts, and countless other settings. |
| Warehouse Management | Where you set up your Warehouse and access specific information about it and its contents. Track Pallets, setup Counts and Move Tasks, and keep track your Equipment here. |
| Material Management | All the information related to your Materials. Create Materials and Material Groups, and set up Material Transfers here. |
| 3PL Management | This is where the Billing happens. Everything related to finances - Billing Codes, Contracts, Invoices, etc. |
| Yard Management | Anything occurring outside the Warehouse but on your property - Dock planning and operations, and scale operations. |
| Procurement Management | Create and manage Procurement Orders. |
| Operations Management | This is where the majority of your day to day will be spent. Create and process Inbound and Outbound Orders and operations, set up Production and Work Orders and Inspections, and more. |
| Manufacturing | Set up and manage Manufacturing Orders and Schedules. |
| Shipping Management | Manage your Shipments directly within Footprint, by comparing up-to-date Shipping Rates and preparing Shipping Manifests that can be transmitted directly to your Carriers. |
Tip
Using the  button, you can Add or Remove the buttons in the menu, reorder them, or collapse them into the bottom of the Footprint Explorer window.
This large portion of the screen is where you will be doing all of your work. Every section you open will appear within this area, often containing several sub-sections in which you will enter and review information.

Upon opening several different modules at once, tabs will appear along the bottom of the workspace. Click whichever module tab you want to work with, and you will be able to view that module's window in the workspace, without closing the information in the other modules you may have open.
The Active Workspace
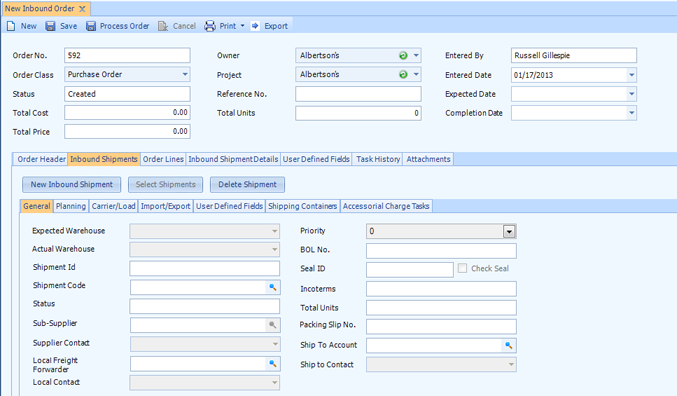
Once you've opened part of a module, your workspace will become active, filled with all of the information and data entry fields you will need to complete the task. With all the options and possible variables certain operations have (as you can see with the New Inbound Order form shown above), the workspace can get very complicated very quickly. Here you see an open section, within which you have the basic information fields on top, and more detailed information fields below. In this particular instance, there are tabbed sections you can fill out (Order Header, Inbound Shipments, Order Lines, etc), and underneath those tabs you may find even more tabs. If this seems complex, do not be discouraged as our guides and tutorials will help you through each step.
Tip
When filling out information, try to keep track of where you are. Take things one field at a time. Start from the top, fill out what information you need to, and work through the forms on each tab, moving left to right.
Customizing Your Workspace
Footprint comes out of the box set up designed to be used efficiently and effectively, but if you prefer to change things up a bit and make them your own, you're in luck - Footprint's interface is designed to be tweaked and rearranged to fit your unique layout.
The windows are designed to be lifted out of the workspace area and dropped wherever you see fit (including back into the workspace).
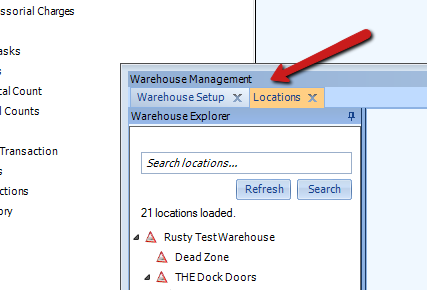
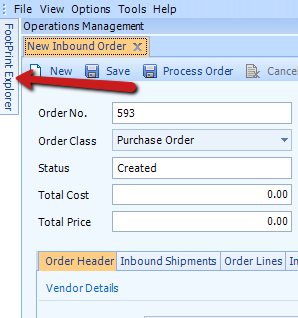
If you click and hold in the area specified in the image above (the bar containing the module's name), you can lift the window you're using in the workspace up and out of the window, and place it wherever you'd like. It will stay where you put it, but if you change focus to another program, it will automatically be hidden, and only return when you return to the Footprintwindow.
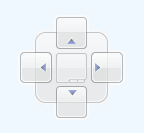
While you are moving the module window around, you will see the tiny directional buttons (shown to the right) appear in the center of the workspace. Similarly, there will be arrow buttons at the edges of the program. As you drag the window over the buttons, you will see an indication of where the window will populate. If you drag the module window you are moving into one of the buttons, it will fill the area specified with the window, back inside of the workspace. Specifically, dragging to one of the directions will fill the workspace with the module as an adjustable window, affixed to the side you've chosen. If you drop the window in the center, it will fill the entire workspace with the module.
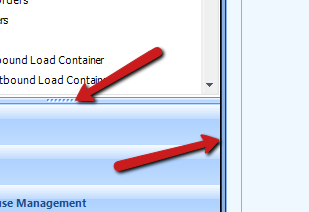
You are also able to adjust the size of the windows you currently have open in the workspace by clicking and dragging the edge of the windows (as specified on the right) left and right, or up and down as the case may be.
In addition to rearranging and resizing the windows however you'd like, you can also "pin" the windows to the sides of the interface, putting them out of the way when you don't need them, but ready to be accessed when you do.
|
|
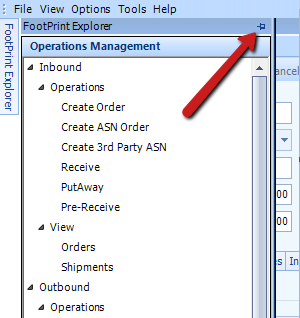
Clicking the Pin Icon  in a window will put the window into pinned mode, and the window will collapse into the side of the interface it is pinned to. By hovering your mouse over the window's tab (labeled with the module's name) for a moment, it will pop back out of the side of the interface, allowing you to access the items within. By clicking the Pin Icon again, you will unpin the window, and return its behavior to normal.
As mentioned before, the Footprint Explorer can be adjusted however you'd like. Using the Configure Buttons Button , you can "Show Fewer Buttons", shrinking the module buttons down to the bottom of the menu, as shown above. You can also hide particular buttons that you'd rather not see, which can be brought back in the same manner.
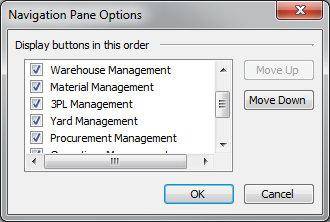
Opening the Navigational Pane Options window, you can again hide buttons by un-checking them, display them by keeping them checked, and rearrange the modules by highlighting the button you wish to move, then clicking "Move Up" or "Move Down" until you are satisfied.
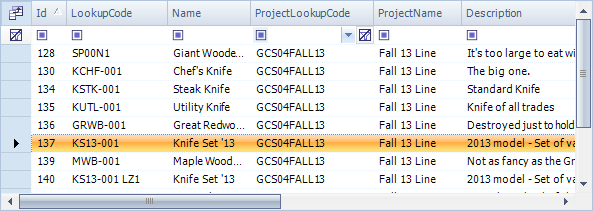
Lists of information, commonly found throughout the Footprint interface, as also able to be customized.
1. Column Headings

Column Headings can be clicked, dragged, and reordered to your liking. You can also organize lists alphabetically/numerically by topic, by clicking the heading you'd like to organize the list by.
2. Search Fields

At the top of every column in Footprint lists is an open field that can be used to search in. Click in that field, and begin typing whatever term you're looking for, and the list will only display items with fields in that column that match what you've typed. You can also click the drop down arrow on the right side of the field to display a list of terms available in the column. By clicking the rightmost Clear Contents Box ![]() , you are able to clear the search field of its contents.
, you are able to clear the search field of its contents.
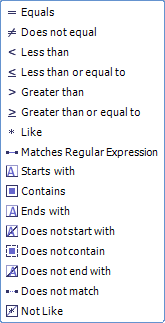
By default, searches in lists look for fields that Contain the information you are typing, but by clicking the small Search Options Box  on the left side of the search field, you can adjust your search to specific conditions, such as: Starts With, Ends With, Does Not Match, Greater Than, Less Than, etc. By clicking the box, you will be met with a drop down list of options.
Tip
The Matches Regular Expression option allows you to filter using additional search operators, listed below.
| . | matches any character |
| \d | matches any digit |
| \w | matches any word character [a-zA-Z_0-9] |
| \s | matches any whitespace character |
| [] | contents define a character class |
| [abc] | matches a, b or c |
| [^abc] | matches anything except a, b or c |
| | | alternation operator ('or') |
| X|Y | matches X or Y |
| X? | matches X once, or not at all |
| X* | matches X zero or more times (matching as much as possible) |
| X*? | matches X zero or more times (matching as little as possible) |
| X+ | matches X one or more times |
| () | grouping characters |
3. Field Chooser
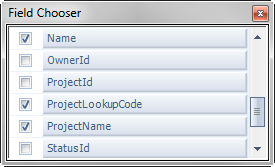
By clicking the small Field Chooser button  in the top left-hand corner of the list, you can open the Field Chooser pop-up window. This window allows you to customize the list's information, selecting which columns to displayed in the list. Once you've put a check mark in the box next to each column you'd like to view, simply close the window, and the information will be displayed. The optional columns to display vary depending on the list you are viewing.
The flexibility of the layout allows for experimentation, and with time, you will find a layout that perfectly matches your needs.
Common Buttons
Here are some of the more common buttons or icons you will see when using Footprint.

|
New Button | Create a New instance of whatever you are working with, be it Owners, Materials, Orders, whatever. You may only see the Page icon while entering information in fields; clicking this allows you to create a new instance of the field you are working with (Material Lots, for example). |

|
Edit Button | Edit the open or selected item. |

|
Save Button | Save changes you've made to the item you are currently working with. |

|
Cancel Button | While editing an item, clicking the Cancel button discards all changes made to the item. |

|
Refresh Button | Refreshes the current page, list, or field to the most current information. You may only see the icon. Pressing the F5 key performs the same function. |

|
Export Button | Usually found by lists, exports the information to a Microsoft Excel file. |

|
Print Button | Opens a drop-down list of Reports related to the screen you are on, which you can open and Print. |

|
Magnifying Glass Icon | Typically in a field, clicking it opens a pop-up window in which you can search for the item you are working with. |

|
Drop-Down Button | Clicking the drop-down button allows you to select an option from a drop-down list, rather than manually entering the information. |

|
Eraser Icon | Clears the field the icon is displayed in. |
| Last Updated: |
| 06/06/2025 |
Copyright © 2025 Datex Corporation